As we add more power to our Cummins diesel, we decided it was time to install gauges that would help monitor performance readings like Exhaust Gas Temperature (EGT), Transmission Temperature and Turbo Boost.
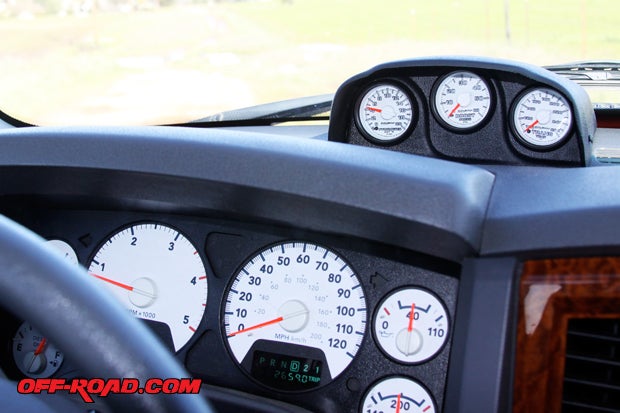
While doing some digging for diesel performance gauges, we found that Auto Meter had just released a new type of gauge that matches the factory instrument cluster called Factory Match Gauges.

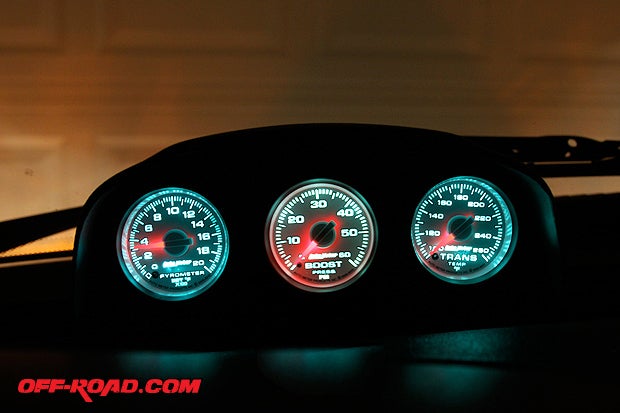
The Dodge Factory Match Gauges from Auto Meter are designed to compliment the factory gauges. They feature great detail: white face, gray numbers outlined in black, AutoMeters signature Hi-Def LED illumination and glowing red pointers.
They are the perfect choice if you are looking for a clean factory look for your diesel truck.
AutoMeter has been around since 1957 developing and manufacturing one of the best racing gauges for automotive enthusiast that want an accurate reading and performance. Based in Sycamore, IL, AutoMeter makes it their business to be at the forefront of precision instrumentation in all forms of motorsports, hot rods, off-road and now diesel performance.

K&N Diesel Performance FIPK II Intake
MagnaFlow Diesel Performance Exhaust
Superchips Flashpaq Diesel Power Programmer
WHY DO YOU NEED DIESEL PERFORMANCE GAUGES?
If you care about your diesel truck, and were sure you do, keeping that motor ticking and trans shifting is at the top of the list. This is especially the case when you start pushing the towing and performance power on your truck.
The Pyrometer gauge keeps tabs on your EGTs. Its important to monitor the temperature if you dont want to melt a piston during hard acceleration or under massive load (e.g. racing or towing). Anything over 1200 degrees Fahrenheit is asking for trouble. Aluminum melts at 1220 and thats what the 5.9l HO 24V Cummins pistons are made from. They will melttrust us.

Besides looking cool, the boost gauges measure the air PSI created by the turbo. The compressed air forced through the intake aids the engine in the combustion of diesel fuel. The boost gauge helps you monitor boost levels, including loss in boost that can be an indicator of a loose hose or leak in the system.
A boost gauge is also helpful for racing or towing applications that run high boost. Anything over 50 PSI can break head bolts if they are not replaced with aftermarket racing head bolts that have higher tinsel. The 5.9l 24V HO produces 32 PSI in its stock form. With a few modifications, such as a boost cheat, 50 PSI is very attainable. An aftermarket racing turbo is also another sure way to increase boost.
Paying attention to your automatic transmission temperature will help increase its life. Temperatures can start to climb quickly during stressful situations, like racing or towing. Automatic transmission fluid (ATF) is good for up to 200 degrees Fahrenheit. Anything above that will cause the ATF to break down and lose viscosity. This degradation could eventually lead to burning up your transmission clutches.
INSTALLATION
The installation of diesel performance gauges can be a daunting task that requires wiring, plumbing, careful planning, and a lot of time. The overall job isnt difficult, but it is time-consuming.
To mount the three gauges, a few different options are available. We choose to go with a dash mount because the grab handle on the A-pillar comes in handy when pulling ourselves in and out of the tall Mega Cab.
")
To make the installation of the boost gauge simple, using a boost bolt is the fastest and easiest way to tap into your engines PSI readings. We found a trick billet aluminum piece by Toxic Diesel out of Joseph, UT. http://www.toxicdiesel.com/

We were so impressed with the clean and simple design that we contacted them and had one sent over for our Mega Cab. Once you see how the Toxic Diesel boost bolt works, youll never want to drill and tap a hole into your intake ever again.
This is an overview of how to install Auto Meter Performance Diesel Gauges on your Dodge Cummins engine and transmission.
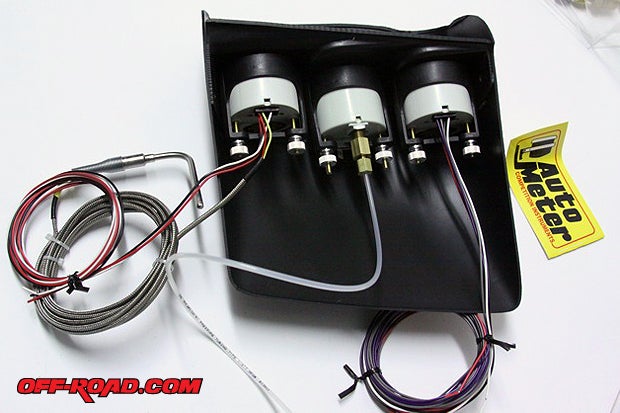
First step is to make sure you have all the correct gauges, wiring, plumbing and mounting hardware.
We used the following parts:
AutoMeter Pyrometer Kit - Part# 8545
AutoMeter Trans Temp Gauge Part# 8557
AutoMeter Boost Gauge Part# 8505
AutoMeter Dash Pod Part# 15020
Toxic Diesel Boost Bolt for Cummins 5.9l 24V (1998.5 2007)
Once you have confirmed all the parts are there, you will need to have access to the following tools:
Power Drill
5/16" drill bit
1/2" drill bit
1/8 NPT Die
SAE Socket/Wrench Set
Metric Socket/Wrench Set
Safety Glasses
Voltmeter

To run wires and plumbing through the firewall we used a plastic plate cover over an existing hole intended for the clutch master cylinder. We drilled a ½ inch hole through it and quickly gained access from inside the cab to the engine bay.
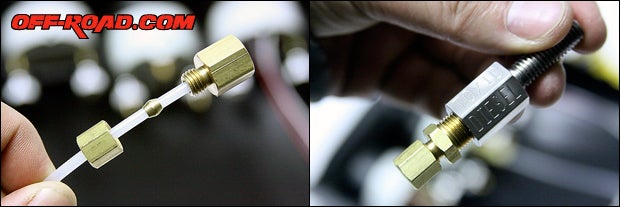
Since we chose to use a mechanical boost gauge, we needed to tap into the intake manifold to get a vacuum for our pipe leading back to the gauge. As we mentioned earlier, instead of tapping into the intake manifold, we used a boost bolt from Toxic Diesel.
Simply remove one of the intake bolts on the engine side and replace it with the Toxic Boost bolt. Hook up the boost tube and fittings, run it into the cab for the gauge--youre done!

Using the Toxic boost bolt saved us the time of removing the intake manifold, drilling and tapping a hole.
Next is the Pyrometer temperature probe. AutoMeter recommends placing the probe before the turbo for an accurate reading. Placing it after the turbo can give a cooler reading of 100-degrees Fahrenheit.
The best place for it is at the exhaust manifold. Make sure to tap into the rear section of the manifold that ties into cylinders #5 and #6. Cummins 5.9l engines tend to run the hottest in those back cylinders.
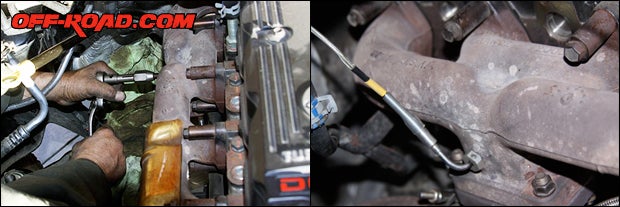
Some people simply drill and tap the manifold without taking the turbo off. We recommend against using this method. Even if you use magnets, a vacuum cleaner and grease to try and capture as much of the metal from falling down into the turbo, you will not be able to all the metal shaving.
Its more work to take the turbo out, but its worth the peace of mind that your turbo will not grenade after installing your diesel gauges. A new turbo runs around $1500, or $800 for a remanufactured one. Take the turbo off and save yourself the grief!
As for the transmission temp-sending unit, were holding off on installing it at this time. We will be adding an aluminum high-capacity transmission pan that comes with a pre-tapped hole for our temp-sending unit. Well show you how in a future article.
For those not looking to add a higher volume pan, you can get a transmission cooler line with sender port from Diesel Manor.
To make the gauges work, you will need 12-volt (+) to power them, ground (-) and a wire that taps into the light dimmer switch to control the intensity of the lights on your diesel gauges.
 current. The nice thing about using this slot is that it turns on and off with the ignition switch. We used a 5 AMP fuse to run all three gauges.")
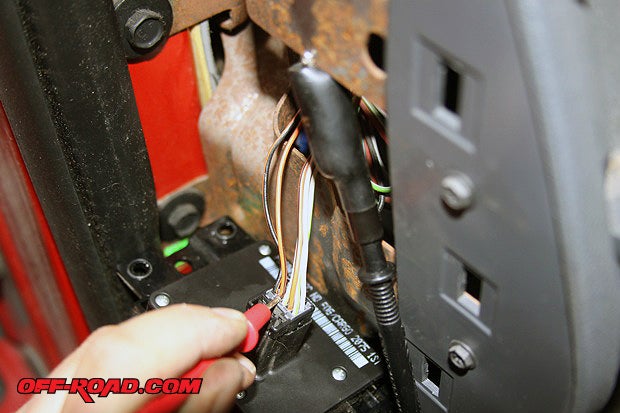
We needed to get a (+) signal from the dimmer switch to control the lighting on the gauges. To have better access to the wiring, the bottom and side panel on the driver side of the dash will need to be removed.
On our 2006 Dodge, the dimmer was the second wire marked orange with a brown line. We confirmed the voltage change by using a voltmeter and rolling the dimmer switch. You can tap into it using a quick splice.

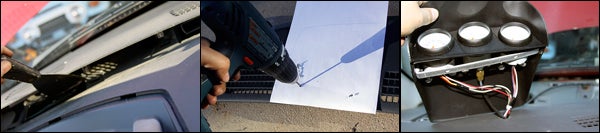
Next is running the wires up through the dashboard and mounting the Auto Meter dash pod. The top/front section of the dashboard is held in place with clips. Gently use a putty knife or anything with a wide flat edge to lift it. Start at one end and carefully work around to the other side until fully removing.
The dash pod goes between windshield duct vents. We made a quick template using some paper to help us line up our drill point and larger hole to pass the wiring and plumbing to the gauges.
Once everything is connected, test the gauges. If everything works, reassemble the dash.
FINAL TOUGHTS
The Auto Meter Dodge Factory Match gauges are great. They truly look like they are factory gauges. Everything matches up perfectly. Having the extra readings is giving us feedback on what the engine is doing, something we didnt have before.
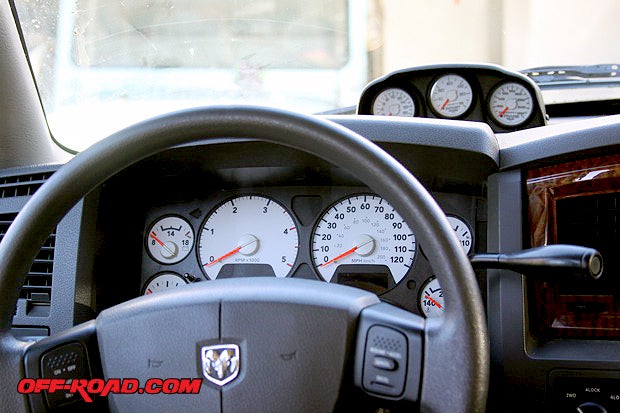
We can monitor the true performance of the truck and back off if were pushing it too hard. I can say that I have more confidence in our performance upgrades since I can visually see our EGTs, boost, and very soon the trans temp.
If you have a diesel truck, you need to get some diesel performance gaugeswhether you have made performance upgrades or not. The extra information will give you confidence and peace of mind when driving your truck.
SOURCES:
AutoMeter
http://www.autometer.com/
(Toll Free) 866-248-6356
Toxic Diesel
http://www.toxicdiesel.com/
(Toll Free) 866-488-6942
Check out other stories from this build:
K&N Diesel Performance FIPK II Intake
MagnaFlow Diesel Performance Exhaust
Superchips Flashpaq Diesel Power Programmer
|
Off-Road.com Newsletter Join our Weekly Newsletter to get the latest off-road news, reviews, events, and alerts! |
Follow @Off-Road
 Your Privacy Choices